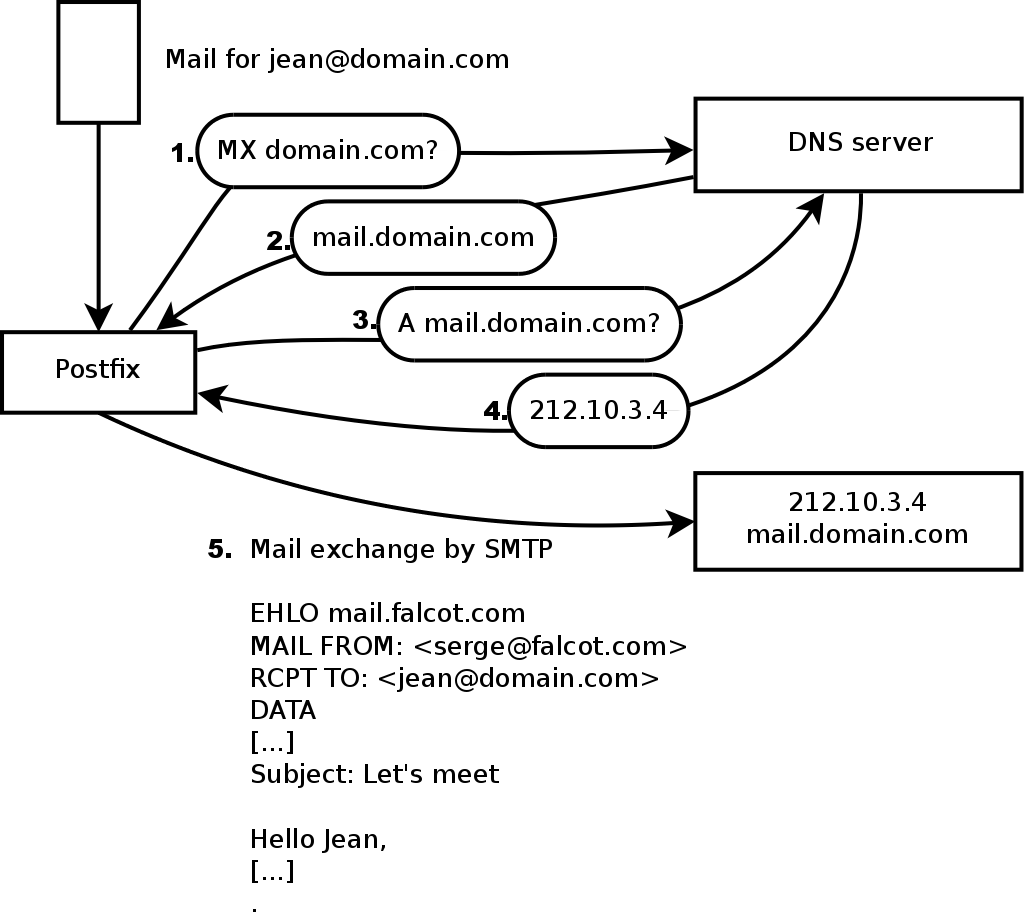
The Falcot Corp administrators selected Postfix for the electronic mail server, due to its reliability and its ease of configuration. Indeed, its design enforces that each task is implemented in a process with the minimum set of required permissions, which is a great mitigation measure against security problems.
11.1.1. Installing Postfix
The
postfix package includes the main SMTP daemon. Other packages (such as
postfix-ldap and
postfix-pgsql) add extra functionality to Postfix, including access to mapping databases. You should only install them if you know you need them.
Several Debconf questions are asked during the installation of the package. The answers allow generating a first version of the
/etc/postfix/main.cf configuration file.
The first question deals with the type of setup. Only two of the proposed answers are relevant in case of an Internet-connected server, “Internet site” and “Internet with smarthost”. The former is appropriate for a server that receives incoming email and sends outgoing email directly to its recipients, and is therefore well-adapted to the Falcot Corp case. The latter is appropriate for a server receiving incoming email nomally, but that sends outgoing email through an intermediate SMTP server — the “smarthost” — rather than directly to the recipient's server. This is mostly useful for individuals with a dynamic IP address, since many email servers reject messages coming straight from such an IP address. In this case, the smarthost will usually be the ISP's SMTP server, which is always configured to accept email coming from the ISP's customers and forward it apporpriately. This setup (with a smarthost) is also relevant for servers that are not permanently connected to the internet, since it avoids having to manage a queue of undeliverable messages that need to be retried later.
The second question deals with the full name of the machine, used to generate email addresses from a local user name; the full name of the machine ends up as the part after the at-sign (“@”). In the case of Falcot, the answer should be
mail.falcot.com. This is the only question asked by default, but the configuration it leads to is not complete enough for the needs of Falcot, which is why the administrators run
dpkg-reconfigure postfix so as to be able to customize more parameters.
One of the extra questions asks for all the domain names related to this machine. The default list includes its full name as well as a few synonyms for
localhost, but the main
falcot.com domain needs to be added by hand. More generally, this question should usually be answered with all the domain names for which this machine should serve as an MX server; in other words, all the domain names for which the DNS says this machine will accept email. This information ends up in the
mydestination variable of the main Postfix configuration file,
/etc/postfix/main.cf.
In some cases, the installation can also ask what networks should be allowed to send email via the machine. In its default configuration, Postfix only accepts emails coming from the machine itself; the local network will usually be added. The Falcot Corp administrators added
192.168.0.0/16 to the default answer. If the question is not asked, the relevant variable in the configuration file is
mynetworks, as seen in the example below.
Local email can also be delivered through
procmail. This tool allows users to sort their incoming email according to rules stored in their
~/.procmailrc file.
After this first step, the administrators got the following configuration file; it will be used as a starting point for adding some extra functionality in the next sections.
Example 11.1. Initial /etc/postfix/main.cf file
# See /usr/share/postfix/main.cf.dist for a commented, more complete version

# Debian specific:  Specifying a file name will cause the first
# line of that file to be used as the name.  The Debian default
# is /etc/mailname.
#myorigin = /etc/mailname

smtpd_banner = $myhostname ESMTP $mail_name (Debian/GNU)
biff = no

# appending .domain is the MUA's job.
append_dot_mydomain = no

# Uncomment the next line to generate "delayed mail" warnings
#delay_warning_time = 4h

# TLS parameters
smtpd_tls_cert_file=/etc/ssl/certs/ssl-cert-snakeoil.pem
smtpd_tls_key_file=/etc/ssl/private/ssl-cert-snakeoil.key
smtpd_use_tls=yes
smtpd_tls_session_cache_database = btree:${queue_directory}/smtpd_scache
smtp_tls_session_cache_database = btree:${queue_directory}/smtp_scache

# See /usr/share/doc/postfix/TLS_README.gz in the postfix-doc package for
# information on enabling SSL in the smtp client.

myhostname = mail.falcot.com
alias_maps = hash:/etc/aliases
alias_database = hash:/etc/aliases
myorigin = /etc/mailname
mydestination = mail.falcot.com, falcot.com, localhost, localhost.localdomain
relayhost =
mynetworks = 127.0.0.0/8 192.168.0.0/16
mailbox_command = procmail -a "$EXTENSION"
mailbox_size_limit = 0
recipient_delimiter = +
inet_interfaces = all
inet_protocols = all
11.1.4. Setting Up greylisting
“Greylisting” is a filtering technique according to which a message is initially rejected with a temporary error code, and only accepted on a further try after some delay. This filtering is particularly efficient against spams sent by the many machines infected by worms and viruses, since these software rarely act as full SMTP agents (by checking the error code and retrying failed messages later), especially since many of the harvested addresses are really invalid and retrying would only mean losing time.
Postfix doesn't provide greylisting natively, but there is a feature by which the decision to accept or reject a given message can be delegated to an external program. The
postgrey package contains just such a program, designed to interface with this access policy delegation service.
Once
postgrey is installed, it runs as a daemon and listens on port 60000. Postfix can then be configured to use it, by adding the
check_policy_service parameter as an extra restriction:
smtpd_recipient_restrictions = permit_mynetworks,
    [...]
    check_policy_service inet:127.0.0.1:60000
Each time Postfix reaches this rule in the ruleset, it will connect to the
postgrey daemon and send it information concerning the relevant message. On its side, Postgrey considers the IP address/sender/recipient triplet and checks in its database whether that same triplet has been seen recently. If so, Postgrey replies that the message should be accepted; if not, the reply indicates that the message should be temporarily rejected, and the triplet gets recorded in the database.
The main disadvantage of greylisting is that legitimate messages get delayed, which is not always acceptable. It also increases the burden on servers that send many legitimate emails.
11.1.5. Customizing Filters Based On the Recipient
The last two sections reviewed many of the possible restrictions. They all have their use in limiting the amount of received spam, but they also all have their drawbacks. It is therefore more and more common to customize the set of filters depending on the recipient. At Falcot Corp, greylisting is interesting for most users, but it hinders the work of some users who need a low latency in their emails (such as the technical support service). Similarly, the commercial service sometimes has problems receiving emails from some Asian providers who may be listed in black-lists; this service asked for a non-filtered address so as to be able to correspond.
Postfix provides such a customization of filters with a “restriction class” concept. The classes are declared in the
smtpd_restriction_classes parameter, and defined the same way as
smtpd_recipient_restrictions. The
check_recipient_access directive then defines a table mapping a given recipient to the appropriate set of restrictions.
Example 11.13. Defining restriction classes in main.cf
smtpd_restriction_classes = greylisting, aggressive, permissive

greylisting = check_policy_service inet:127.0.0.1:10000,
        check_policy_service inet:127.0.0.1:60000
aggressive = reject_rbl_client sbl-xbl.spamhaus.org,
        check_policy_service inet:127.0.0.1:60000
permissive = permit

smtpd_recipient_restrictions = permit_mynetworks,
        reject_unauth_destination,
        check_recipient_access hash:/etc/postfix/recipient_access
Example 11.14. The /etc/postfix/recipient_access file
# Unfiltered addresses
postmaster@falcot.com  permissive
support@falcot.com     permissive
sales-asia@falcot.com  permissive

# Aggressive filtering for some privileged users
joe@falcot.com         aggressive

# Special rule for the mailing-list manager
sympa@falcot.com       reject_unverified_sender

# Greylisting by default
falcot.com             greylisting
11.1.6. Integrating an Antivirus
The many viruses circulating as attachments to emails make it important to set up an antivirus at the entry point of the company network, since despite an awareness campaign, some users will still open attachments from obviously shady messages.
The Falcot administrators selected
clamav for their free antivirus. The main package is
clamav, but they also installed a few extra packages such as
arj,
unzoo,
unrar and
lha, since they are required for the antivirus to analyze attachments archived in one of these formats.
The task of interfacing between antivirus and the email server goes to
clamav-milter. A
milter (short for
mail filter) is a filtering program specially designed to interface with email servers. A milter uses a standard application programming interface (API) that provides much better performance than filters external to the email servers. Milters were initially introduced by
Sendmail, but
Postfix soon followed suit.
Once the
clamav-milter is installed, the
/etc/default/clamav-milter file must be edited, so that the milter is configured to run on a TCP port rather than on the default named socket:
SOCKET=inet:10002@127.0.0.1
This new configuration is taken into account by running
/etc/init.d/clamav-milter restart.
The standard ClamAV configuration fits most situations, but some important parameters can still be customized with
dpkg-reconfigure clamav-base. Similarly, running
dpkg-reconfigure clamav-milter allows defining the mail filter's behaviour in some detail.
The last step involves telling Postfix to use the recently-configured filter. This is a simple matter of adding the following directive to
/etc/postfix/main.cf:
# Virus check with clamav-milter
smtpd_milters = inet:[127.0.0.1]:10002
If the antivirus causes problems, this line can be commented out, and
/etc/init.d/postfix reload should be run so that this change is taken into account.
All messages handled by Postfix now go through the antivirus filter.
11.1.7. Authenticated SMTP
Being able to send emails requires an SMTP server to be reachable; it also requires said SMTP server to send emails through it. For roaming users, that may need regularly changing the configuration of the SMTP client, since Falcot's SMTP server rejects messages coming from IP addresses apparently not belonging to the company. Two solutions exist: either the roaming user installs an SMTP server on their computer, or they still use the company server with some means of authenticating as an employee. The former solution is not recommended since the computer won't be permanently connected, and it won't be able to retry sending messages in case of problems; we will focus on the latter solution.
SMTP authentication in Postfix relies on SASL (
Simple Authentication and Security Layer). It requires installing the
libsasl2-modules and
sasl2-bin packages, then registering a password in the SASL database for each user that needs authenticating on the SMTP server. This is done with the
saslpasswd2 command, which takes several parameters. The
-u option defines the authentication domain, which must match the
smtpd_sasl_local_domain parameter in the Postfix configuration. The
-c option allows creating a user, and
-f allows specifying the file to use if the SASL database needs to be stored at a different location than the default (
/etc/sasldb2).
# saslpasswd2 -h `postconf -h myhostname` -f /var/spool/postfix/etc/sasldb2 -c jean
[... type jean's password twice ...]
Note that the SASL database was created in Postfix's directory. In order to ensure consistency, we also turn
/etc/sasldb2 into a symbolic link pointing at the database used by Postfix, with the
ln -sf /var/spool/postfix/etc/sasldb2 /etc/sasldb2 command.
Now we need to configure Postfix to use SASL. First the
postfix user needs to be added to the
sasl group, so that it can access the SASL account database. A few new parameters are also needed to enable SASL, and the
smtpd_recipient_restrictions parameter needs to be configured to allow SASL-authenticated clients to send emails freely.
Example 11.15. Enabling SASL in /etc/postfix/main.cf
# Enable SASL authentication
smtpd_sasl_auth_enable = yes
# Define the SASL authentication domain to use
smtpd_sasl_local_domain = $myhostname
[...]
# Adding permit_sasl_authenticated before reject_unauth_destination
# allows relaying mail sent by SASL-authenticated users
smtpd_recipient_restrictions = permit_mynetworks,
    permit_sasl_authenticated,
    reject_unauth_destination,
[...]